For those just venturing into the world of mobile app development, MVP (minimum viable product) is a term you should familiarize yourself with fairly quickly. Not only will an MVP assist in validating your idea for a mobile product, but it will also provide direction towards which app features you should include to achieve success.

So what does all this mean? An MVP is all about testing your idea and discovering what will work to properly target your customer. This article serves as a step-by-step guide that will provide you with a basic understanding of how to plan a minimum viable product as you work through our free MVP template.
An MVP is a minimal form of your product that is tested on the market. This development strategy allows your team to validate (or invalidate) product assumptions and learn how your target users react and experience your product’s core functionality. This approach will provide insight into properly allocating your budget to satisfy your overall business objectives. Building an MVP is an iterative process designed to identify user pain points and determine the appropriate product functionality to address those needs over time.
In mobile app development, an MVP is a development method where you develop only the core functionalities to solve a specific problem and satisfy early adopters. Essentially, an MVP is the basic model of your product that will fulfill the primary goal you want to achieve.
MVP development follows a build-measure-learn process, which allows you to release a product that can be continually improved as you validate (or invalidate) assumptions, learn what users want, and build future iterations of your app that better serve your customers.
The main goal of an MVP is to develop a working product that provides immediate value, quickly, while minimizing costs. Starting with an MVP will allow you to learn more about your end-user and the market you wish to enter as you test your assumptions. An MVP will also set the stage for future iterations of development and clarify the sequential steps to take in the project – whether that’s changing directions entirely, or continuing down your set development path. In some instances, an MVP can also be used to showcase business potential and win stakeholder buy-in. Whether you’re looking for support from internal or external investors, an MVP definitely strengthens your position, as it proves the merit of your product and secure funding for future development.
Below we outline the steps involved in creating an MVP and discuss in detail what occurs at each stage. For added value, download a copy of our MVP template fill it in as you work through this guide.

This process is part of the agile app development MVP framework we use at Clearbridge Mobile for our mobile app development projects. Following these steps will help you identify and prioritize features, as well as help you confidently outline what you need to get your MVP to market.
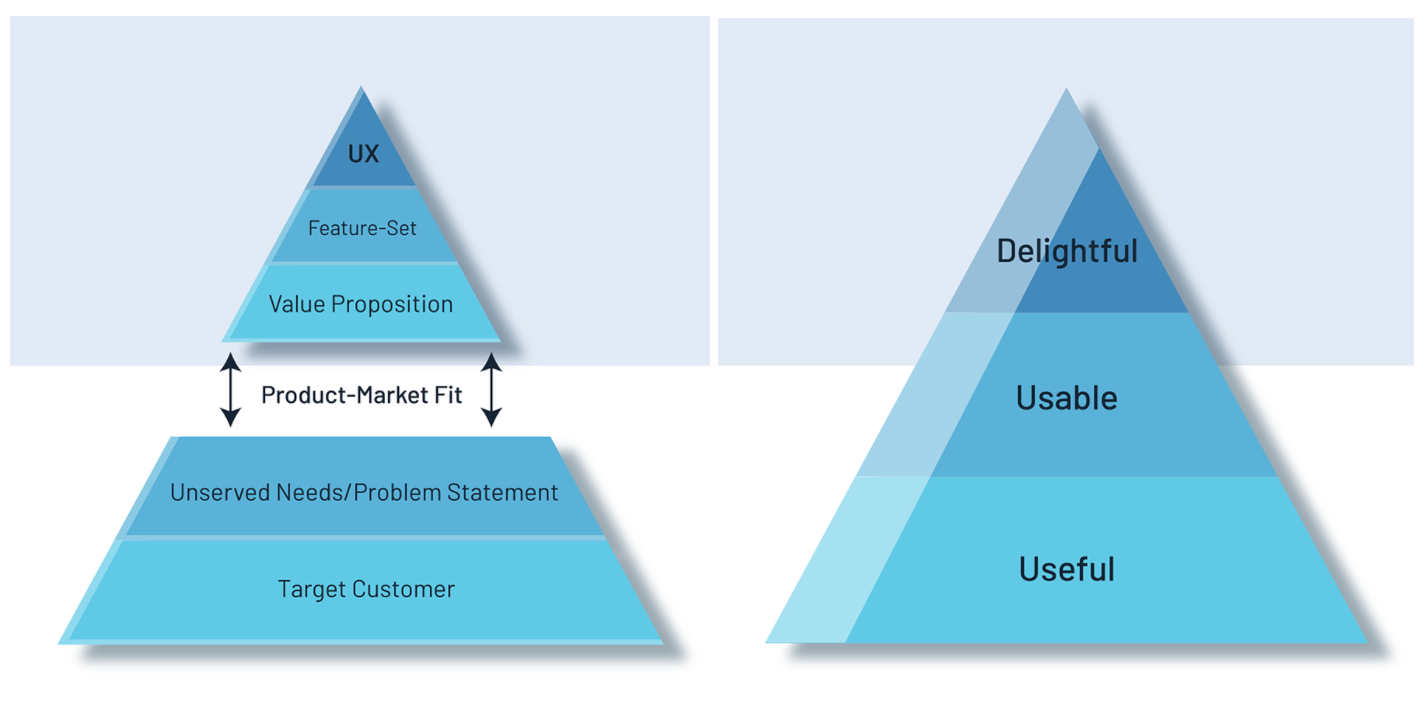
The first step is to identify if there is a need for your product in the market. This can be an organizational need or a customer need that addresses a current gap. It is also important to analyze what your competitors are doing and establish how you can make your product stand out. This will help determine what kind of mobile product you need to be successful.
Once you’ve determined there is a need for your product, it is important for you to set a long-term business goal: what are you planning to achieve? For example, if you are a coffee shop chain, you may have the long-term goal of reducing checkout time by 30 percent.
Next, identify what will define the success of your product. Our coffee chain, for example, might define success by reaching that 30 percent time-to-checkout reduction, having 100,000 active monthly users, and reaching $1 million in monthly transactions via their app.

It is important to design your mobile product with your users in mind. A good way to ensure that your users will have a good experience with the first iteration of your app is by mapping out user journeys. This will allow you to look at your product from the perspective of the user, beginning with opening the app to reaching an end goal, such as making a purchase. This provides insight into how you can design the app in a way that is convenient for users. In addition, defining user flow and addressing the actions users need to take in order to complete an end goal, ensures you don’t miss anything while keeping user satisfaction in mind.
Who will be using your product? It’s possible that you will have more than one category of users. For example, if you have a service appointment booking app, you may have the appointment scheduler (customer) and the service technician.
The jobs are the actions that the user or users need to take in order to reach the story ending and achieve the goal. When planning your MVP, you will likely want to look at which user has the most jobs and focus on that user; however, there may be higher priorities that need to be addressed, so you may need to focus on a different user or even multiple users.
For each user, there will be a story ending, which is the goal for the user (i.e. booking an appointment).
Below is an example of how we would lay out a user journey:

Once you’ve worked out the user flow you will want to create a pain and gain map for each action. The pain and gain map allows you to identify all user pain points and the gains the user achieves when each is addressed. This tactic lets you determine where you have the greatest potential to add value. You are then able to focus your MVP in these areas while adding the less impactful ones to your product roadmap for future releases.
We recommend organizing the pain and gain map into a chart. Here is what a pain and gain chart might look like for the Pet Adopter user.

At this stage, you will be able to discern what features to include in your MVP, as well as what features to include on your product roadmap that are a lower priority. Below are some tools you can use to decide which features are necessary to make your MVP successful. Asking the question of what does my user want vs. what does my user need, can help Identify and prioritize features. Keep in mind, implementing too many user-requested features too soon can harm the user experience and take away from the overall purpose of the product. The only features you should include should be connected to your product’s overall goal.
Use opportunity statements to finalize what features you want to build out. At this stage in the MVP development process, you will want to create feature sentences. For our Pet Adopters that are applying to adopt animals, for example, the opportunity statement “How might we expedite the application process?” could become “Reduce application processing time by 10 percent.”
List the user and the specific opportunity statements, and provide a breakdown of the features to include in the product roadmap.
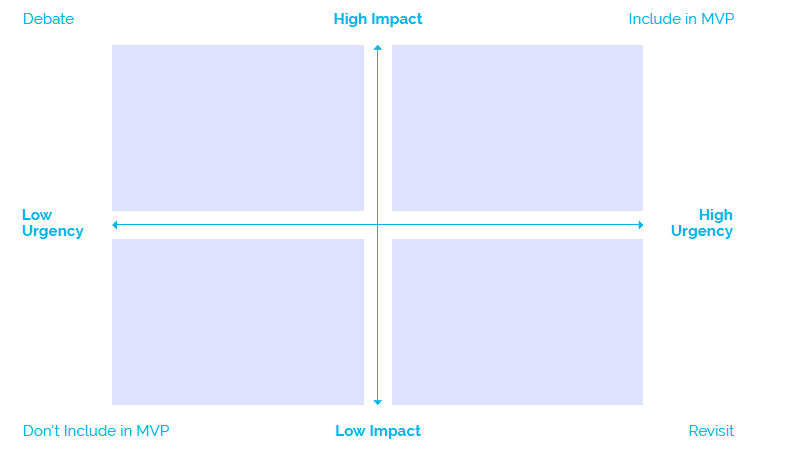
This step helps you identify where you can make the most impact in relation to the urgency of the feature. Using a prioritization matrix, you can make the final decision on what absolutely needs to be included in your MVP, and what features can be included in later releases. Below is our recommended format for your MVP prioritization matrix.
At this point, you should have a strong foundation to plan a minimum viable product. You have identified and understood your business or customer needs; you have found the opportunity to address the pain points, and have decided what features to build and their priority. Now, you can focus on getting your MVP to market.
After Launching your MVP it is imperative that you collect feedback from your users. Users tell us where the product is lacking and ensures market validation. This will help you generate new ideas grounded in user behavior research which will shape the subsequent versions of your product. It is important to continue to test, learn and measure, and then test again until the product is finalized.
10 Best Practices to Enhance Your Mobile App User Experience
How Design Thinking Leads to a Better Minimum Viable Product
How to Prioritize Features for Your Mobile App MVP