I recently published a tutorial, How to Develop a Google Assistant App: Handling User Input, where we learned how to incorporate user input into our conversations. In this tutorial, we will learn how to connect our Google Assistant app with Google Calendar API so that we can create events using Google Assistant. After following this tutorial, we will have finished creating our Google Assistant app that schedules appointments with Clearbridge Mobile.
To get started, we need to have the following things set up for our project to work:
To set up a webhook, we will create a folder with index.js and package.json and node packages.
After creating the files, we will deploy the files on Firebase so that we can connect it to our Google Assistant app. Previously in our blog series, we covered how to set up a webhook. For more information on setting up the webhook check out the previous blog. The webhook allows us to program our response logic so this step is crucial to get Google Assistant connected with Google Calendar API.

Next, we will be setting up the Google Calendar API. The Calendar API is what allows us to create events on our calendar. To begin, follow Google’s Quickstart guide to authorize Calendar API access for your Google account. You can confirm that your Calendar API is enabled for your Google account by running the sample code that Google provided on their Quickstart guide. This process of authentication will create additional files that grant access to your Google Calendar. Be sure to keep all of the additional files as they will be crucial when connecting Google Calendar API with Google Assistant.
After ensuring the Google Calendar API is enabled with the desired google account, we will move the authentication files into our webhook folder, and deploy the Calendar API related files. This gives our Google Assistant app access to build programs for the assistant. Specifically, we will move the “client_secret.json” and “calendar-nodejs-quickstart.json” into our functions folder so that it could be deployed on Firebase to be used by Dialogflow.
Now that we have the required files set up for the Google Calendar API deployed on Firebase, we can begin programming our Google Calendar Assistant app. In our previous blog, we programmed an intent that responded to the phrase “Create an appointment.” In this tutorial, we will be continuing the fulfillment for our bookAppointment intent, and complete its business logic with the Google Calendar API to schedule an appointment.
Be sure to have your intents connected to a function on your webhook using the actionMap. Next, we need to configure the file paths on our code so that our app can communicate with the authentication files for the Calendar API.
The following code has modified Google’s Quickstart code guide and Google Calendar Insert code guide so that it is compatible with Google Assistant.
[code lang=”js”]
const SCOPES = [‘https://www.googleapis.com/auth/calendar’];
const TOKEN_PATH = ‘calendar-nodejs-quickstart.json’;
const secret = "client_secret.json"
var calendar = google.calendar(‘v3’);
var _app;
[/code]
In addition to setting the file paths, we also created a variable called “_app”. “_app” will later be used to store the app’s reference in our functions.
Next, we add Google’s authorization methods.
[code lang=”js”]
// This is a Google Calendar API Sample
/**
* Create an OAuth2 client with the given credentials, and then execute the
* given callback function.
*
* @param {Object} credentials The authorization client credentials.
* @param {function} callback The callback to call with the authorized client.
*/
function authorize(credentials, callback) {
var clientSecret = credentials.installed.client_secret;
var clientId = credentials.installed.client_id;
var redirectUrl = credentials.installed.redirect_uris[0];
var auth = new googleAuth();
var oauth2Client = new oAuth2Client(clientId, clientSecret, redirectUrl);
// Check if we have previously stored a token.
fs.readFile(TOKEN_PATH, function(err, token) {
if (err) {
getNewToken(oauth2Client, callback);
} else {
oauth2Client.credentials = JSON.parse(token);
callback(oauth2Client);
}
});
}
/**
* Get and store new token after prompting for user authorization, and then
* execute the given callback with the authorized OAuth2 client.
*
* @param {google.auth.OAuth2} oauth2Client The OAuth2 client to get token for.
* @param {getEventsCallback} callback The callback to call with the authorized
* client.
*/
function getNewToken(oauth2Client, callback) {
var authUrl = oauth2Client.generateAuthUrl({
access_type: ‘offline’,
scope: SCOPES
});
console.log(‘Authorize this app by visiting this url: ‘, authUrl);
var rl = readline.createInterface({
input: process.stdin,
output: process.stdout
});
rl.question(‘Enter the code from that page here: ‘, function(code) {
rl.close();
oauth2Client.getToken(code, function(err, token) {
if (err) {
console.log(‘Error while trying to retrieve access token’, err);
return;
}
oauth2Client.credentials = token;
storeToken(token);
callback(oauth2Client);
});
});
}
/**
* Store token to disk be used in later program executions.
*
* @param {Object} token The token to store to disk.
*/
function storeToken(token) {
fs.writeFile(TOKEN_PATH, JSON.stringify(token));
}
[/code]
After adding the authorization methods, we implement a createEvent function so that we can schedule an event on the Calendar API.
[code lang=”js”]
function createEvent(auth) {
let userDate = _app.getArgument(‘date’);
let eventName = _app.getArgument(‘name’);
var event = {
‘summary’: ‘Appointment with Clearbridge’,
‘description’: ‘A chance to discuss services provided by Clearbridge’,
‘start’: {
},
‘end’: {
}
};
event.summary = eventName;
event.start.date = userDate;
event.end.date = userDate;
// insert event to calendar
calendar.events.insert({
auth: auth,
calendarId: ‘primary’,
resource: event,
}, function(err, event) {
if (err) {
_app.tell(‘There was an error contacting the Calendar service: ‘ + err);
return;
}
_app.ask(eventName + " has been scheduled for " + userDate + ".");
});
}
[/code]
Finally, we will call the functions we have implemented above in our bookAppointment function.
[code lang=”js”]
function bookAppointment(app) {
googleRequest(app, createEvent);
}
[/code]
After adding all the code, save your file and deploy it on the webhook.
Then, test your app! Here is the result:
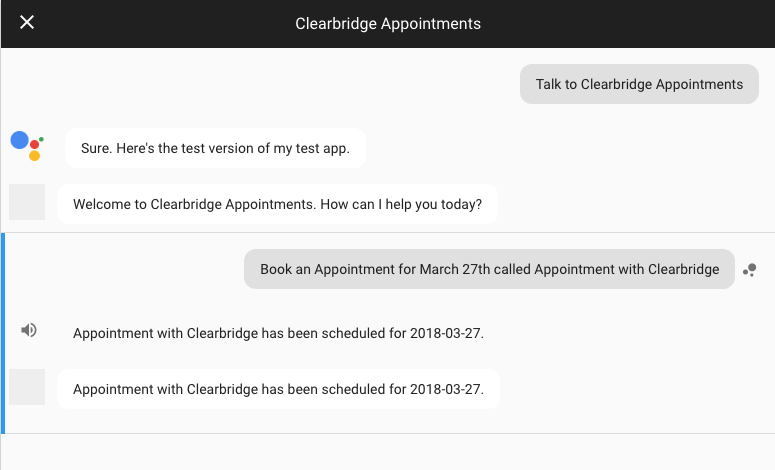
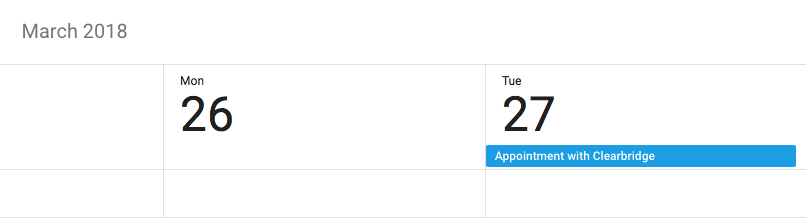
There you have it! You have now finished creating an app that schedules an event for you on Google Calendar. That concludes our Google Assistant blog series where we’ve covered the following topics:
If you have any more questions or are interested in developing a Google Assistant application for your company, contact Clearbridge Mobile today.